| PrimaLuna ProLougue Four Upgrades The Performance of the stock PL4 Power Amp is very good, but it may be possible to improve things by upgrading some of the parts in key positions. First order of the day, was to try and find a circuit diagram. I trawled the Internet but nothing could be found. The closest thing I came across, was an out of focus schematic for the ProLogue One Integrated Amp, below. Primaluna PL1 Circuit  This schematic might be useful for owners of the PL1 Integrated, so I thought it worthwhile uploading it. The PL1 is a very similar circuit to the PL4, using common power amp components, only the front ends differ. I opened up my Amp, traced the point to point wiring paths and noted the component values. Using this information I was able to modify the PL1 drg to match my PL4 layout. I concentrated on the Amplifier section at the top of the schematic, as the Power Supply and Auto Bias sections are the same. This resulted in the schematic below, which I used as the reference for my modifications. 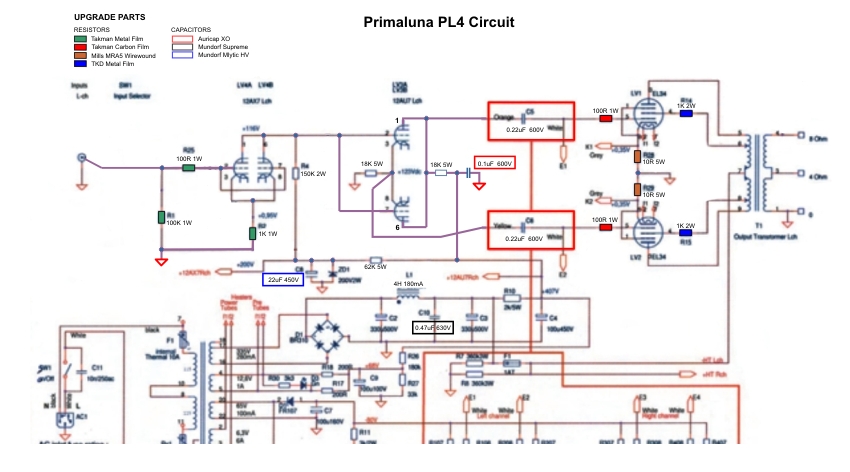 I've marked the component values more clearly and colour coded the parts I upgraded, see the key for these at the top left of the schematic. All parts supplied by HiFi Collective. I noticed the Choke in my power supply, has different values to the PL1 diagram, so I altered this on my drg for the P4. The picture below shows the location of the parts to be changed (marked in Red). I also changed the Power On LED from Green to Blue to match my other equipment. 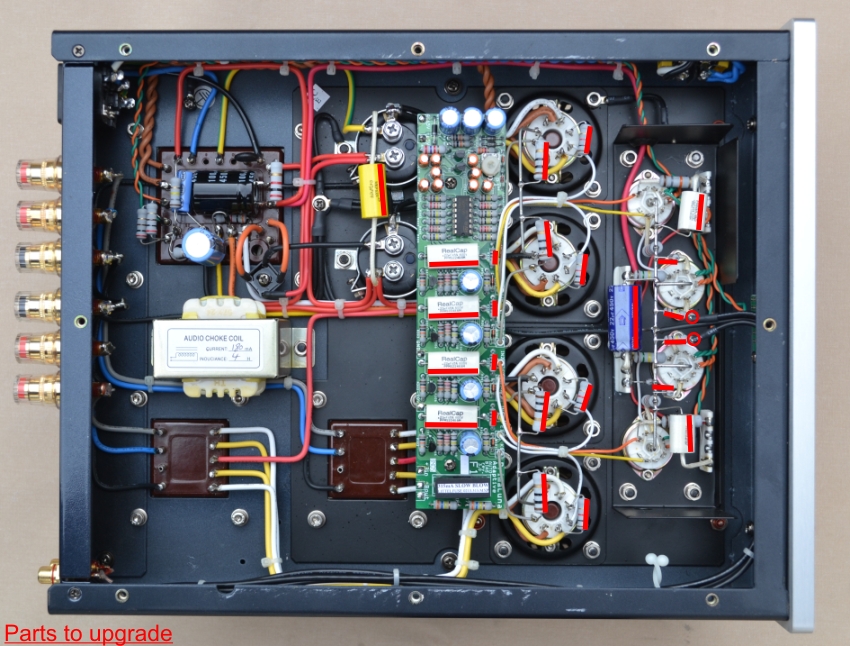 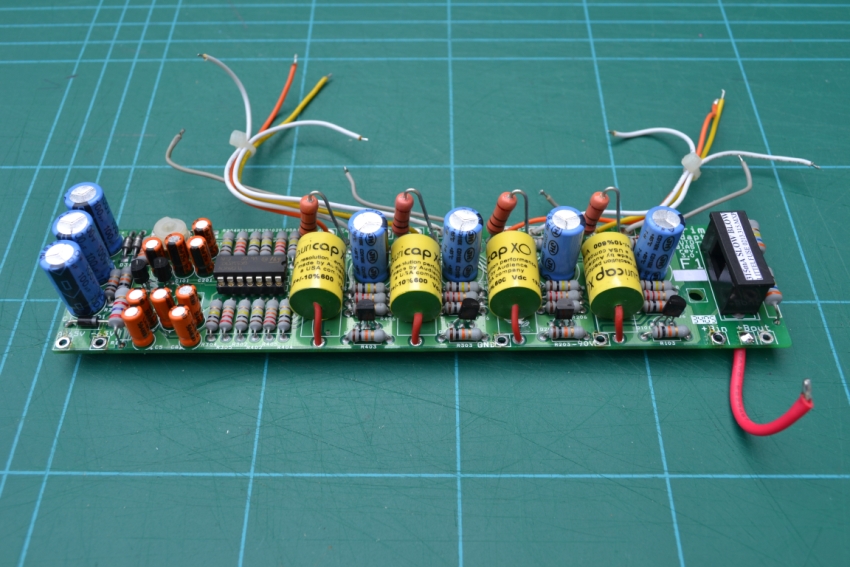 I had to remove the Auto Bias board, to change the interstage coupling caps and resistors. Because these parts are mounted on the same PCB, many people think they are part of the Auto Bias circuit, they are not! There are Orange and Yellow leads from the inversion tubes up to the resistors, then White leads from the caps to the power tubes. You can see their relative location in the circuit using the schematic above, it's just a convenient place to mount these parts. The Auto Bias circuit is connected between the resistor and cap, which is a reason to mount them in close proximity. However, not all PrimaLuna models have these parts mounted on the Auto Bias PCB. I used AuricapXO in place of the fitted RealCap's and 1W Takman Carbon film resistors to replace the 1/2W MOX. PrimaLuna's top models use Takman Carbon Film in these locations, so I followed suit. The parts that have the most influence on the sound, are the ones in the signal path, so the input resistors and the interstage coupling caps/resistors were a priority. The other parts were less critical, but may as well be changed, while working on the Amp. I've seen some huge Teflon or Copper foil caps squeezed into these amps, they look out of place, hanging in some strange locations and they cost nearly as much as the Amp. These are not appropriate modifications in my opinion, if you're spending that much on upgrades, it might have been better, to have bought a better amp in the first place. The neat layout and point to point wiring is a feature of these Amps, so why go and spoil things, fitting oversize parts in awkward locations? The AuricapXO are well reviewed as coupling caps and are a similar size to those fitted, so they can occupy the same positions. I'm sure they will be an improvement over the stock Chinese RealCaps, without going crazy on boutique parts. I read a couple of cap comparison reviews, that praised the Mundorf Supreme for use in power supplies, where it did a good job at cleaning things up. I fitted one as the film bypass for the big Nichicon Electrolytics. The MOX input resistors were changed to Takman Metal Films and the MOX cathode bias resistors on the output tubes, were changed to Mills MRA5 wire wound. When fitting the Blue LED I added some additional resistance, to bring its brightness down to a comfortable level. You can see the Blue resistor I added, in the picture below, it's to the right of the top inversion Tube, where the LED draws its power from the heater circuit. Those are the main things that I changed (as can be seen below), a full list of these parts is on the schematic above.  If you are wondering what I've added in the bottom left corner, its a pair of XLR sockets. 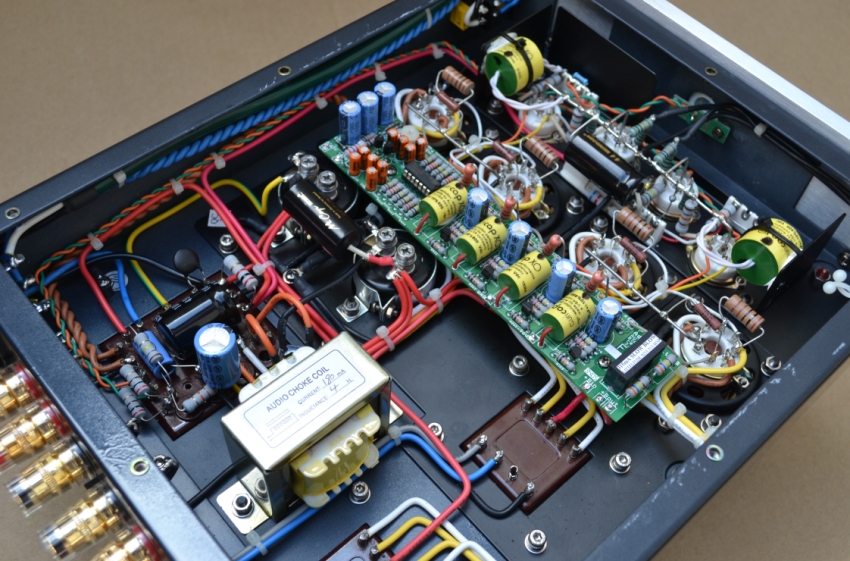 I made use of the metal shielding plate, to mount the larger two capacitors. I think these modifications look tidy and in keeping with the original clean layout. 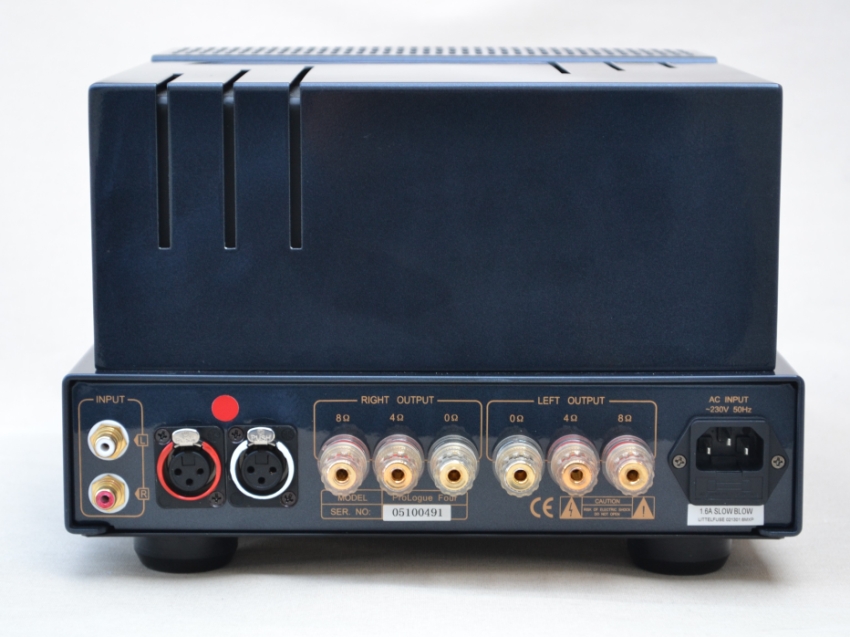 These are the XLR sockets I installed, they are just daisy chained to the RCA connectors and as such are single ended inputs, not balanced. I don't like RCA connections and much prefer using XLR cables, which allow the use of a separate screen and audio ground. I wired them as Pin1=Screen, Pin2=Audio Signal, Pin3=Audio Ground. I've installed similar single ended XLR outputs on my Pre Amp. This arrangement allows me to use standard XLR leads to connect these two single ended devices. It keeps all my interconnects consistent and interchangeable. I use the same type of XLR interconnect throughout my mixed set up, of SE/Balanced equipment. The RCA inputs are still usable, which allows a bit of flexibility when connecting to other peoples equipment. Feet These are the aluminium feet I fitted to match my other equipment, Chinese off ePay. Roughly the same height as the original Rubber blobs, but more attractive, especially when the system is viewed as a whole, from my listening position. 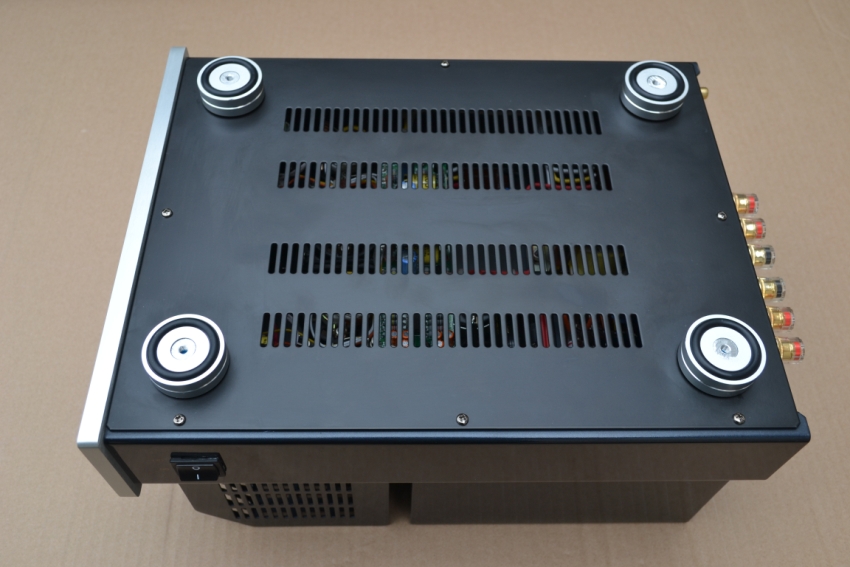 Sound The Amp is just driving the Mid Range and Tweeters in a 3-Way pair of speakers. The PL4 sounds good out of the box, so these relatively inexpensive upgrades won't make a night and day difference to the sound quality. I would sum it up by saying, the midrange is fuller bodied and marginally richer, right down into the crossover region of the bass. There is a small improvement in transparency and an overall increase in fine detail. It's a very balanced presentation, which doesn't highlight any frequency area. Very musical and easy to listen to. Tube Rolling The stock PrimaLuna branded EL34 Power Tubes are not bad at all, so I'll keep these for now. 12AX7 is supplied as the first stage driver tube, as a general comment on this type, it's high gain (x100), microphonic and not well liked for its sonic abilities, no matter what brand or era its from. Many people recommend changing to a New Old Stock (NOS) 5751. This is a military spec tube that has a much sturdier build, so it's not microphonic. It's also a very sweet sounding tube and has lower gain (x70) so is consequently very quite in use. The lower gain is not an issue for me as the Amp is more than capable of powering my Mids/Twt's. In reality, it goes just as loud, my Pre Amp just has to drive it harder to reach full output. With the stock PrimaLuna 12AX7 fitted, there was a very slight hiss at the speakers, with my ear close up. I purchased some NOS (early 60's) GE Grey plate 5751's, with these fitted the background is silent and they sound better as well. It's no coincidence that Conrad Johnson used GE 5751's in their top end Pre Amps of the 1980's. The 12AU7 supplied for the phase inverter stage are current production and nothing special. I swapped these for a pair of NOS (early 60's) Radio Technique 12AU7 (French Phillips) and much preferred them. |
 |
 |